1.简介
使用SpringBoot;
1)创建SpringBoot应用,选中我们需要的模块;
2)SpringBoot已经默认将这些场景配置好了,只需要在配置文件中指定少量配置就可以运行起来
3)自己编写业务代码;
自动配置原理?
这个场景SpringBoot帮我们配置了什么?能不能修改?能修改哪些配置?能不能扩展?…………
1 | xxxxAutoConfiguration:帮我们给容器中自动配置组件; |
2.SpringBoot对静态资源的映射规则
1 | (prefix = "spring.resources", ignoreUnknownFields = false) |
1 | WebMvcAuotConfiguration: |
1)所有 /webjars/** ,都去 classpath:/META-INF/resources/webjars/ 找资源;
webjars:以jar包的方式引入静态资源;http://www.webjars.org/
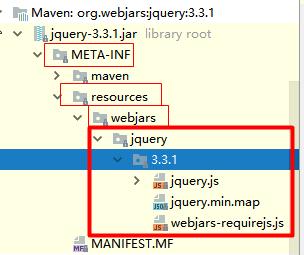
此时访问localhost:8080/webjars/jquery/3.3.1/jquery.js,发现是可以的。
1 | <!--引入jquery-webjar-->在访问的时候只需要写webjars下面资源的名称即可 |
2)”/**” 访问当前项目的任何资源,都去(静态资源的文件夹)找映射
1 | "classpath:/META-INF/resources/", |
localhost:8080/abc === 去静态资源文件夹里面找abc
3)欢迎页: 静态资源文件夹下的所有index.html页面;被”/**”映射;
localhost:8080/ 找index页面
4)所有的 **/favicon.ico 都是在静态资源文件下找;
上述静态资源的路径:
若要修改上述静态资源的文件夹:
1 | =classpath:/hello/,classpath:/hi/ |
3.模板引擎
JSP、Velocity、Freemarker、Thymeleaf

SpringBoot推荐的Thymeleaf;
语法更简单,功能更强大;
3.1引入thymeleaf
1 | <dependency> |
注:SpringBoot2.2.0自动安装的starter版本为3.0.11,所以不需要再自己升级了
3.2Thymeleaf使用
1 | (prefix = "spring.thymeleaf") |
所以,只要我们把HTML页面放在classpath:/templates/,thymeleaf就能自动渲染,但是需要注意的是,如果只使用@RestController注解是不会自动渲染html页面的,需要使用@Controller和@ResponseBody
1 |
|
1 |
|
使用:
1、导入thymeleaf的名称空间
1 | <html lang="en" xmlns:th="http://www.thymeleaf.org"> |
2、使用thymeleaf语法;
1 |
|
对应的
1 |
|
3.3语法规则
1、th:text;改变当前元素里面的文本内容;
th:任意html属性,来替换原生属性的值;
2、表达式?
1 | expressions:(表达式语法) |
4.SpringMVC自动配置
4.1.Spring MVC auto-configuration
Spring Boot 自动配置好了SpringMVC
以下是SpringBoot对SpringMVC的默认配置:(WebMvcAutoConfiguration)
Inclusion of
ContentNegotiatingViewResolverandBeanNameViewResolverbeans.- 自动配置了ViewResolver(视图解析器:根据方法的返回值得到视图对象(View),视图对象决定如何渲染(转发?重定向?))
- ContentNegotiatingViewResolver:组合所有的视图解析器的;
- 如何定制:我们可以自己给容器中添加一个视图解析器;自动的将其组合进来;
Support for serving static resources, including support for WebJars.
- 静态资源文件夹路径,webjars
Static
index.htmlsupport.- 静态首页访问
Custom
Faviconsupport .- favicon.ico
Automatic registration of
Converter,GenericConverter,Formatterbeans.- Converter:转换器; public String hello(User user):类型转换使用Converter
- Formatter: 格式化器; 2017.12.17===Date;
1 |
|
自己添加的格式化器转换器,我们只需要放在容器中即可
Support for
HttpMessageConverters.HttpMessageConverter:SpringMVC用来转换Http请求和响应的;User—Json;
HttpMessageConverters是从容器中确定;获取所有的HttpMessageConverter;自己给容器中添加HttpMessageConverter,只需要将自己的组件注册容器中(@Bean,@Component)
Automatic registration of
MessageCodesResolver.- 定义错误代码生成规则
Automatic use of a
ConfigurableWebBindingInitializerbean.我们可以配置一个ConfigurableWebBindingInitializer来替换默认的;(添加到容器)
1
2初始化WebDataBinder;
请求数据=====JavaBean;
org.springframework.boot.autoconfigure.web:web的所有自动场景;
If you want to keep Spring Boot MVC features, and you just want to add additional MVC configuration (interceptors, formatters, view controllers etc.) you can add your own @Configuration class of type WebMvcConfigurerAdapter, but without @EnableWebMvc. If you wish to provide custom instances of RequestMappingHandlerMapping, RequestMappingHandlerAdapter or ExceptionHandlerExceptionResolver you can declare a WebMvcRegistrationsAdapter instance providing such components.
If you want to take complete control of Spring MVC, you can add your own @Configuration annotated with @EnableWebMvc.
4.2扩展SpringMVC
1 | <mvc:view-controller path="/hello" view-name="success"/> |
编写一个配置类(@Configuration),是WebMvcConfigurerAdapter类型;不能标注@EnableWebMvc;
既保留了所有的自动配置,也能用我们扩展的配置;
1 | //使用WebMvcConfigurerAdapter可以来扩展SpringMVC的功能 |
原理:
1)、WebMvcAutoConfiguration是SpringMVC的自动配置类
2)、在做其他自动配置时会导入;@Import(EnableWebMvcConfiguration.class)
1 |
|
3)、容器中所有的WebMvcConfigurer都会一起起作用;
4)、我们的配置类也会被调用;
效果:SpringMVC的自动配置和我们的扩展配置都会起作用;
4.3全面接管SpringMVC
SpringBoot对SpringMVC的自动配置不需要了,所有都是我们自己配置;所有的SpringMVC的自动配置都失效了
我们需要在配置类中添加@EnableWebMvc即可;
1 | //使用WebMvcConfigurerAdapter可以来扩展SpringMVC的功能 |
原理:
为什么@EnableWebMvc自动配置就失效了;
1)@EnableWebMvc的核心
1 | (DelegatingWebMvcConfiguration.class) |
2)、
1 |
|
3)、
1 |
|
4)、@EnableWebMvc将WebMvcConfigurationSupport组件导入进来;
5)、导入的WebMvcConfigurationSupport只是SpringMVC最基本的功能;
5.如何修改SpringBoot的默认配置
模式:
1)、SpringBoot在自动配置很多组件的时候,先看容器中有没有用户自己配置的(@Bean、@Component)如果有就用用户配置的,如果没有,才自动配置;如果有些组件可以有多个(ViewResolver)将用户配置的和自己默认的组合起来;
2)、在SpringBoot中会有非常多的xxxConfigurer帮助我们进行扩展配置
3)、在SpringBoot中会有很多的xxxCustomizer帮助我们进行定制配置
6.RestfulCRUD
6.1默认访问首页
1 | //使用WebMvcConfigurerAdapter可以来扩展SpringMVC的功能 |
6.2国际化
1)、编写国际化配置文件;
2)、使用ResourceBundleMessageSource管理国际化资源文件
3)、在页面使用fmt:message取出国际化内容
步骤:
1)、编写国际化配置文件,抽取页面需要显示的国际化消息
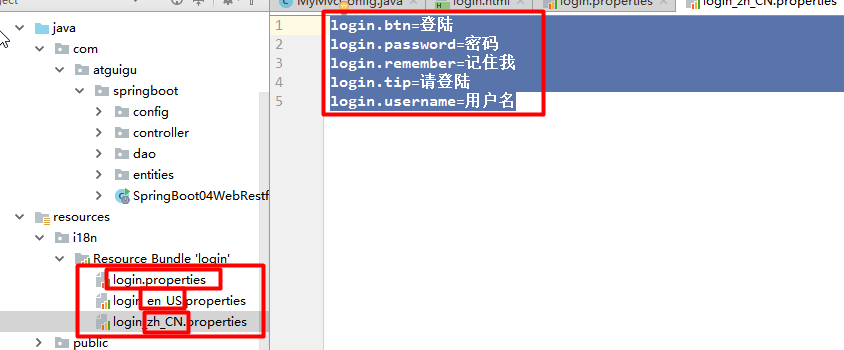
2)、SpringBoot自动配置好了管理国际化资源文件的组件;
1 | (prefix = "spring.messages") |
3)、去页面获取国际化的值;
1 |
|
效果:根据浏览器语言设置的信息切换了国际化;
原理:
国际化Locale(区域信息对象);LocaleResolver(获取区域信息对象);
1 |
|
4)、点击链接切换国际化
1 | /** |
6.3登陆
开发期间模板引擎页面修改以后,要实时生效
1)、禁用模板引擎的缓存
1 | # 禁用缓存 |
2)、页面修改完成以后ctrl+f9:重新编译;
登陆错误消息的显示
1 | <p style="color: red" th:text="${msg}" th:if="${not #strings.isEmpty(msg)}"></p> |
6.4拦截器进行登陆检查
拦截器
1 | /** |
注册拦截器
1 | //所有的WebMvcConfigurerAdapter组件都会一起起作用 |
6.5CRUD-员工列表
实验要求:
1)、RestfulCRUD:CRUD满足Rest风格;
URI: /资源名称/资源标识 HTTP请求方式区分对资源CRUD操作
| 普通CRUD(uri来区分操作) | RestfulCRUD | |
|---|---|---|
| 查询 | getEmp | emp—GET |
| 添加 | addEmp?xxx | emp—POST |
| 修改 | updateEmp?id=xxx&xxx=xx | emp/{id}—PUT |
| 删除 | deleteEmp?id=1 | emp/{id}—DELETE |
2)、实验的请求架构;
| 实验功能 | 请求URI | 请求方式 |
|---|---|---|
| 查询所有员工 | emps | GET |
| 查询某个员工(来到修改页面) | emp/1 | GET |
| 来到添加页面 | emp | GET |
| 添加员工 | emp | POST |
| 来到修改页面(查出员工进行信息回显) | emp/1 | GET |
| 修改员工 | emp | PUT |
| 删除员工 | emp/1 | DELETE |
3)、员工列表:
thymeleaf公共页面元素抽取
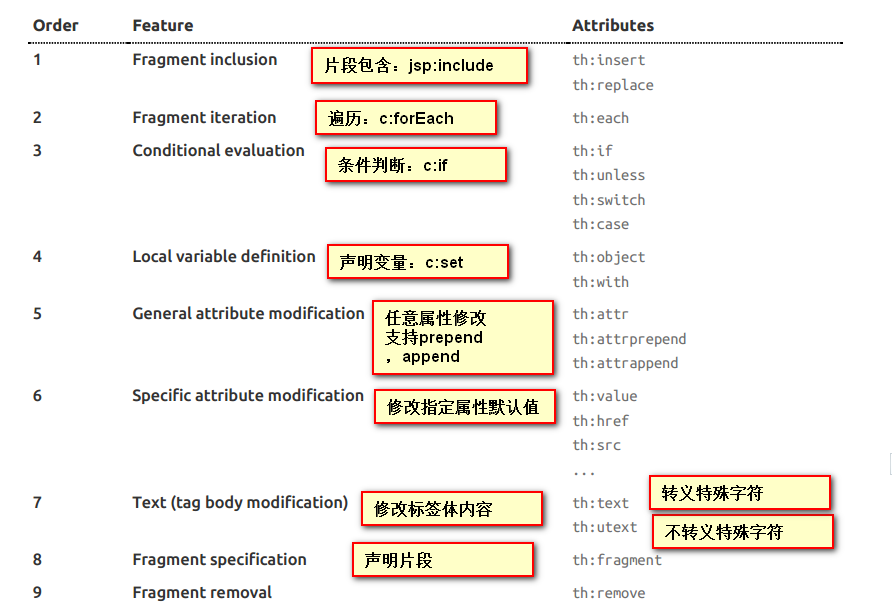
1 | 1、抽取公共片段 |
三种引入公共片段的th属性:
th:insert:将公共片段整个插入到声明引入的元素中
th:replace:将声明引入的元素替换为公共片段
th:include:将被引入的片段的内容包含进这个标签中
1 | <footer th:fragment="copy"> |
引入片段的时候传入参数:
1 | <nav class="col-md-2 d-none d-md-block bg-light sidebar" id="sidebar"> |
6.6CRUD-员工添加
添加页面
1 | <form> |
提交的数据格式不对:生日:日期;
2017-12-12;2017/12/12;2017.12.12;
日期的格式化;SpringMVC将页面提交的值需要转换为指定的类型;
2017-12-12—Date; 类型转换,格式化;
默认日期是按照/的方式;
6.7CRUD-员工修改
修改添加二合一表单
1 | <!--需要区分是员工修改还是添加;--> |
6.8CRUD-员工删除
1 | <tr th:each="emp:${emps}"> |
7.错误处理机制
7.1SpringBoot默认的错误处理机制
默认效果:
1)、浏览器,返回一个默认的错误页面
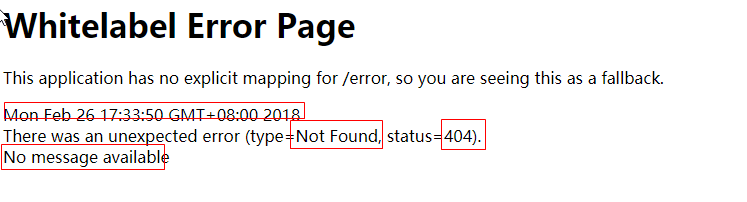
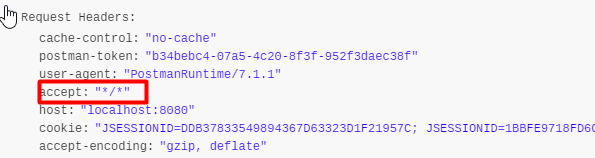
浏览器发送请求的请求头:

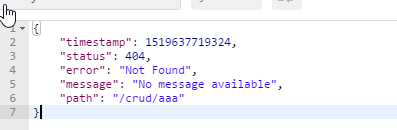
2)、如果是其他客户端,默认响应一个json数据
原理:
可以参照ErrorMvcAutoConfiguration;错误处理的自动配置;
给容器中添加了以下组件 1、DefaultErrorAttributes:
1 | 帮我们在页面共享信息; |
2、BasicErrorController:处理默认/error请求
1 |
|
3、ErrorPageCustomizer:
1 | ("${error.path:/error}") |
4、DefaultErrorViewResolver:
1 |
|
步骤:
一但系统出现4xx或者5xx之类的错误;ErrorPageCustomizer就会生效(定制错误的响应规则);就会来到/error请求;就会被BasicErrorController处理;
1)响应页面;去哪个页面是由DefaultErrorViewResolver解析得到的;
1 | protected ModelAndView resolveErrorView(HttpServletRequest request, |
7.2如果定制错误响应:
7.2.1如何定制错误的页面;
1)、有模板引擎的情况下;error/状态码; 【将错误页面命名为 错误状态码.html 放在模板引擎文件夹里面的 error文件夹下】,发生此状态码的错误就会来到 对应的页面;
我们可以使用4xx和5xx作为错误页面的文件名来匹配这种类型的所有错误,精确优先(优先寻找精确的状态码.html);
页面能获取的信息;
timestamp:时间戳
status:状态码
error:错误提示
exception:异常对象
message:异常消息
errors:JSR303数据校验的错误都在这里
2)、没有模板引擎(模板引擎找不到这个错误页面),静态资源文件夹下找;
3)、以上都没有错误页面,就是默认来到SpringBoot默认的错误提示页面;
7.2.2如何定制错误的json数据;
1)、自定义异常处理&返回定制json数据;
1 |
|
2)、转发到/error进行自适应响应效果处理
1 | (UserNotExistException.class) |
7.2.3将我们的定制数据携带出去;
出现错误以后,会来到/error请求,会被BasicErrorController处理,响应出去可以获取的数据是由getErrorAttributes得到的(是AbstractErrorController(ErrorController)规定的方法);
1、完全来编写一个ErrorController的实现类【或者是编写AbstractErrorController的子类】,放在容器中;
2、页面上能用的数据,或者是json返回能用的数据都是通过errorAttributes.getErrorAttributes得到;
容器中DefaultErrorAttributes.getErrorAttributes();默认进行数据处理的;
自定义ErrorAttributes
1 | //给容器中加入我们自己定义的ErrorAttributes |
最终的效果:响应是自适应的,可以通过定制ErrorAttributes改变需要返回的内容,

8.配置嵌入式Servlet容器
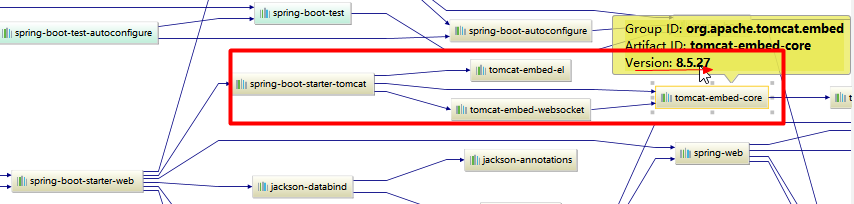
SpringBoot默认使用Tomcat作为嵌入式的Servlet容器;
问题?
8.1如何定制和修改Servlet容器的相关配置
1、修改和server有关的配置(ServerProperties【也是EmbeddedServletContainerCustomizer】);
1 | =8081 |
2、编写一个EmbeddedServletContainerCustomizer:嵌入式的Servlet容器的定制器;来修改Servlet容器的配置
1 | //一定要将这个定制器加入到容器中 |
8.2注册Servlet三大组件【Servlet、Filter、Listener】
由于SpringBoot默认是以jar包的方式启动嵌入式的Servlet容器来启动SpringBoot的web应用,没有web.xml文件。
注册三大组件用以下方式
ServletRegistrationBean
1 | //注册三大组件 |
FilterRegistrationBean
1 |
|
ServletListenerRegistrationBean
1 |
|
SpringBoot帮我们自动SpringMVC的时候,自动的注册SpringMVC的前端控制器;DIspatcherServlet;
DispatcherServletAutoConfiguration中:
1 | (name = DEFAULT_DISPATCHER_SERVLET_REGISTRATION_BEAN_NAME) |
2)、SpringBoot能不能支持其他的Servlet容器;
8.3替换为其他嵌入式Servlet容器
默认支持:
Tomcat(默认使用)
1 | <dependency> |
Jetty
1 | <!-- 引入web模块 --> |
Undertow
1 | <!-- 引入web模块 --> |
8.4嵌入式Servlet容器自动配置原理;
EmbeddedServletContainerAutoConfiguration:嵌入式的Servlet容器自动配置?
1 | (Ordered.HIGHEST_PRECEDENCE) |
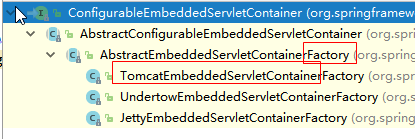
1)、EmbeddedServletContainerFactory(嵌入式Servlet容器工厂)
1 | public interface EmbeddedServletContainerFactory { |
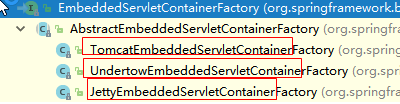
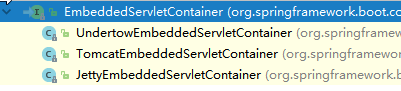
2)、EmbeddedServletContainer:(嵌入式的Servlet容器)
3)、以TomcatEmbeddedServletContainerFactory为例
1 |
|
4)、我们对嵌入式容器的配置修改是怎么生效?
1 | ServerProperties、EmbeddedServletContainerCustomizer |
EmbeddedServletContainerCustomizer:定制器帮我们修改了Servlet容器的配置?
怎么修改的原理?
5)、容器中导入了EmbeddedServletContainerCustomizerBeanPostProcessor
1 | //初始化之前 |
步骤:
1)、SpringBoot根据导入的依赖情况,给容器中添加相应的EmbeddedServletContainerFactory【TomcatEmbeddedServletContainerFactory】
2)、容器中某个组件要创建对象就会惊动后置处理器;EmbeddedServletContainerCustomizerBeanPostProcessor;
只要是嵌入式的Servlet容器工厂,后置处理器就工作;
3)、后置处理器,从容器中获取所有的EmbeddedServletContainerCustomizer,调用定制器的定制方法
###5)、嵌入式Servlet容器启动原理;
什么时候创建嵌入式的Servlet容器工厂?什么时候获取嵌入式的Servlet容器并启动Tomcat;
获取嵌入式的Servlet容器工厂:
1)、SpringBoot应用启动运行run方法
2)、refreshContext(context);SpringBoot刷新IOC容器【创建IOC容器对象,并初始化容器,创建容器中的每一个组件】;如果是web应用创建AnnotationConfigEmbeddedWebApplicationContext,否则:AnnotationConfigApplicationContext
3)、refresh(context);刷新刚才创建好的ioc容器;
1 | public void refresh() throws BeansException, IllegalStateException { |
4)、 onRefresh(); web的ioc容器重写了onRefresh方法
5)、webioc容器会创建嵌入式的Servlet容器;createEmbeddedServletContainer();
6)、获取嵌入式的Servlet容器工厂:
EmbeddedServletContainerFactory containerFactory = getEmbeddedServletContainerFactory();
从ioc容器中获取EmbeddedServletContainerFactory 组件;TomcatEmbeddedServletContainerFactory创建对象,后置处理器一看是这个对象,就获取所有的定制器来先定制Servlet容器的相关配置;
7)、使用容器工厂获取嵌入式的Servlet容器:this.embeddedServletContainer = containerFactory .getEmbeddedServletContainer(getSelfInitializer());
8)、嵌入式的Servlet容器创建对象并启动Servlet容器;
先启动嵌入式的Servlet容器,再将ioc容器中剩下没有创建出的对象获取出来;
==IOC容器启动创建嵌入式的Servlet容器==
9.使用外置的Servlet容器
嵌入式Servlet容器:应用打成可执行的jar
优点:简单、便携;
缺点:默认不支持JSP、优化定制比较复杂(使用定制器【ServerProperties、自定义EmbeddedServletContainerCustomizer】,自己编写嵌入式Servlet容器的创建工厂【EmbeddedServletContainerFactory】);
外置的Servlet容器:外面安装Tomcat—应用war包的方式打包;
9.1步骤
1)、必须创建一个war项目;(利用idea创建好目录结构)
2)、将嵌入式的Tomcat指定为provided;
1 | <dependency> |
3)、必须编写一个SpringBootServletInitializer的子类,并调用configure方法
1 | public class ServletInitializer extends SpringBootServletInitializer { |
4)、启动服务器就可以使用;
9.2原理
jar包:执行SpringBoot主类的main方法,启动ioc容器,创建嵌入式的Servlet容器;
war包:启动服务器,服务器启动SpringBoot应用【SpringBootServletInitializer】,启动ioc容器;
servlet3.0(Spring注解版):
8.2.4 Shared libraries / runtimes pluggability:
规则:
1)、服务器启动(web应用启动)会创建当前web应用里面每一个jar包里面ServletContainerInitializer实例:
2)、ServletContainerInitializer的实现放在jar包的META-INF/services文件夹下,有一个名为javax.servlet.ServletContainerInitializer的文件,内容就是ServletContainerInitializer的实现类的全类名
3)、还可以使用@HandlesTypes,在应用启动的时候加载我们感兴趣的类;
流程:
1)、启动Tomcat
2)、org\springframework\spring-web\4.3.14.RELEASE\spring-web-4.3.14.RELEASE.jar!\META-INF\services\javax.servlet.ServletContainerInitializer:
Spring的web模块里面有这个文件:org.springframework.web.SpringServletContainerInitializer
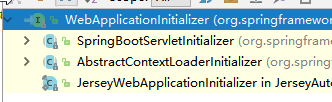
3)、SpringServletContainerInitializer将@HandlesTypes(WebApplicationInitializer.class)标注的所有这个类型的类都传入到onStartup方法的Set<Class<?>>;为这些WebApplicationInitializer类型的类创建实例;
4)、每一个WebApplicationInitializer都调用自己的onStartup;
5)、相当于我们的SpringBootServletInitializer的类会被创建对象,并执行onStartup方法
6)、SpringBootServletInitializer实例执行onStartup的时候会createRootApplicationContext;创建容器
1 | protected WebApplicationContext createRootApplicationContext( |
7)、Spring的应用就启动并且创建IOC容器
1 | public ConfigurableApplicationContext run(String... args) { |
启动Servlet容器,再启动SpringBoot应用
注:转载文章请注明出处,谢谢~